My Wedge Production Process
Mar 30, 2024 14:43:54 GMT -5
germanname1990, therealcu2010, and 5 more like this
Post by duke on Mar 30, 2024 14:43:54 GMT -5
I was making some wedges anyway today, so I thought that I would document my process in hopes that it may help others that want to make similarly-styled wedges.
I will try to focus more on the parts of this process that are unique to this project since this is already going to go long. Basic techniques for both 3D printing and cutting machines are well-documented outside of the scope of this forum, and I encourage you to seek them out.
Today’s goal is to make the base tiles representing the changes that happened to Classic Layout A (Round 1 starting Season 4 and Rounds 1 &2 starting with the all-cash era). This includes the Gamboge 600 being replaced with a 900, the Free Spin being permanently replaced by a Yellow 500, and the nearby Arctic 150 being replaced with a 500. Each of these changes requires that we make one new base tile with three wedges.

The 3D prints will take the longest (about 5 hours apiece), so to begin I get the first one of those started. By the time we come back from breakfast, we’ve made some progress:

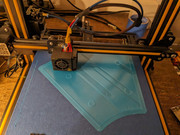
Leaving the printer to do its thing, I figure out how much wedge stock in each color I’m going to need. I already have a Yellow 500 made in an earlier batch, so looks like today I need 2 Red, 2 Gamboge, 1 Purple, 2 Arctic, and 1 Pink. I make wedges in pairs for efficient use of material, and each pair requires a 6”x12” piece of stock. So I’ll need to make one piece of stock for each color. Looks like by some stroke of luck I already have previously-cut cardstock for all 5 colors, so I just need to cut 6” strips of vinyl laminate and adhesive sheets.


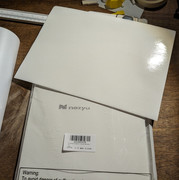
I place the vinyl laminate upside down on an adhesive mat from my cutting machine, and remove the backing, exposing the adhesive. I carefully line up the long edge of the cardstock with the edge of the laminate creating sort of a hinge, and then gently lower the other long edge, pressing them together from hinge to open end using a brayer.


I carefully separate the now-laminated cardstock from the adhesive mat using a large scraper, taking care to move slowly and not accidentally crease the stock. I give the cardstock and laminate another good braying. I do a similar process with the double-sided adhesive sheet, placing the sheet on the adhesive mat, peeling the backing to expose one side of the adhesive, and then hinging the cardstock into place as before, of course making sure the laminated side is up, and then pressing together from hinge to open end again using a brayer. The backing of the adhesive sheet does not really stick to the mat, so scraping is not necessary. I give the now triple-layer stock another good braying to push out any air bubbles on either side that might be remaining.


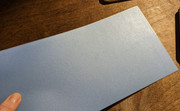
I repeat this for all five colors I'm making today.
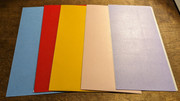
Now that all of my stock is made, I can now cut the wedge shapes from it. Since the adhesive backing does not stick to the cutting machine’s adhesive mat, I tape the stock down to the adhesive mat with 3/4” masking tape, aligning the stock with the top-left corner of the grid. I feed the stock into the machine and start the cutting process. Since I have created my own Frankenstock to cut, I had to create my own material settings in the designer software. These settings will vary depend on the weights and brands of material used. At the end, I carefully separate the cut wedges from the excess stock.


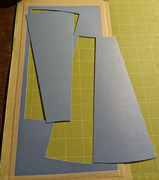
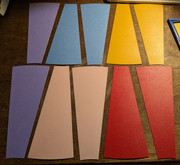
I repeat for all five pieces of stock and end up with ten wedges. One of the pinks and one of the purples are extra to be used at a later time.
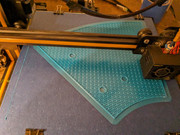
Let’s see how the tile print is doing – not bad, it’s done with the bottom layers and have moved on to the infill layers. We can clearly see where the magnets are going to go.
Now it’s time to cut the vinyl. I’m making eight wedges, and again I will have two wedges per 6” strip of vinyl, so I need four 6” strips. After cutting those, I bray a piece of vinyl down onto the adhesive mat, again aligning to the top-left corner of the grid. I feed it into the machine, and start the cut.

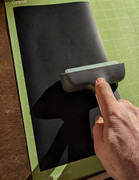
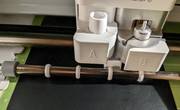
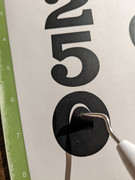
Beautiful. It’s time to remove all of that excess vinyl using a weeding tool.


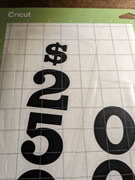
Perfect. Now I place a 6”x12” piece of transfer tape over the entire cut. I put it back into the machine to have it cut the transfer tape into our familiar wedge shape around each DV.


I carefully pull up one of the DVs, and attach it to the “press” half of my wedge alignment jig, ensuring that the edges are aligned. I put the target wedge into the “well” half of the jig. I carefully hinge the top of the press into the top of the well, pressing the transfer down onto the wedge.


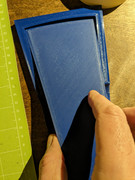
I carefully remove the press and wedge from the well, give it a quick braying, and carefully separate the press from the transfer tape. I give the wedge another good braying, before carefully removing the transfer tape, ensuring that the vinyl remains on the wedge.


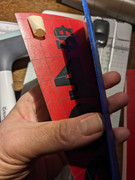
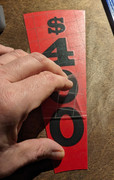
That’s one wedge done!

I repeat that for the other DV that was cut, and then repeat that entire process three times more to make the other six wedges. It so happens that for three of the four, I could use DV pairs that I had created before. But I needed to create a new designer project for the remaining 700/900 combo.

Now, combined with the Yellow 500 I already had from before, I have all nine wedges ready to go! But… the printer still lags behind.

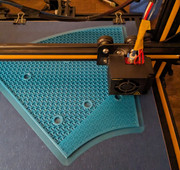
The printer finally pauses to allow me to add the magnets. I put a small drop of superglue in each channel. Yes, before I started using superglue, I did have a magnet jump out and attack the print head. So now all magnets get superglued. Each magnet gets a masking tape dot, for two reasons. First, the filament adheres better to the masking tape. Bare magnets tend to push away the small tendril of filament (magnets slightly repel anything not attracted to them), and the filament tendril is more than happy to oblige because it likes to seek out heat, and the closest heat source is the print head right above. Second, it helps make it clear which pole of the magnet should be facing up, and indeed, I use a “magnet jig” to make sure my magnets are all aligned to the right polarity before dotting them.


I use a metal putty knife to aid in placing the magnets in each channel, making sure that the magnets are fully in the channel and are not protruding above the current level of the print by pressing the magnets into place firmly with the putty knife. I test each magnet’s adhesion with the putty knife to make sure it is set before continuing the print.


The printer successfully prints over the magnets. They are in there forever now. No going back.

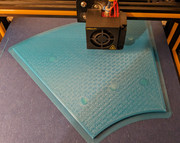
Finally, the printer is done! But I still have more work to do. I cool the build plate to ensure that the part will no longer warp before setting, and then carefully work the print off of the build plate from beneath using a putty knife. I stick it down firmly to the workbench to finish cooling. Also, it was a close call on having enough filament on the spool. The slicing software claimed I didn't have enough, but I know that the estimates from the software are a little high for this type/brand of filament.


The non-sticky side of the masking tape on the print bed likes to bond a little to the PETG of the print. Luckily some universal solvent (water) and a little time sorts this. A couple of hours on a wet rag leaves the masking tape easy to remove without leaving fibers behind. A bit of quick bevel sanding will take the brims right off of those edges. While I am sanding, I test fit the tile on the wheel, sanding down any points of resistance when placing or removing the tile.



Once fit is confirmed, I can finally apply wedges! I put four pieces of masking tape on the back to wrap around to the front and temporarily hold the wedges in place. I align the wedges how they should be, with no overhangs, overlaps, or gaps, and tape them down.


Starting with one side, I take a wedge, carefully remove the backing for the adhesive, and then, positioning very carefully, I hinge the edge of that wedge against the edge of the middle wedge that is still taped down. Checking, double checking, and triple checking my positioning as I go, I carefully lower the open end into place. I do not press down until I have confirmed I am happy with the position, otherwise, I have some leeway to nudge, pull up, or otherwise adjust the wedge so that again there are no overhangs, overlaps or gaps. I repeat for the other two wedges on the tile. I’ve had equal success going left-right-middle and left-middle-right for sequence.



It’s unfortunate, but the cutting machine only has so much dimensional accuracy. Sometimes it cuts a wedge a bit long, in which case, I push any overhang toward the bottom of the wedge (toward the center of the wheel). If I do have such an overhang, I carefully remove it by turning the tile upside down, and lightly running an X-Acto knife along the edge of the tile, making multiple light passes cutting the overhanging material. This takes a bit of skill to get a clean edge that rivals a CNC cut, so I take my time here. It’s not ideal, but I’d rather it cut a bit long and have me trim than cut a bit short and leave a gap.
Finally, the tile is done! All that’s left is to place it on the wheel.

This is my wedge and tile making process. Hopefully someone finds it useful and is at least able to take a few steps and apply them to their own build.
I’m still waiting for the other two tiles to print. Once they are done and I attach the wedges, I will post an update with pics of the finished product from those.
Thanks once again to MarioGS and wheelgenius for providing the base artwork that my artwork is derived from.


